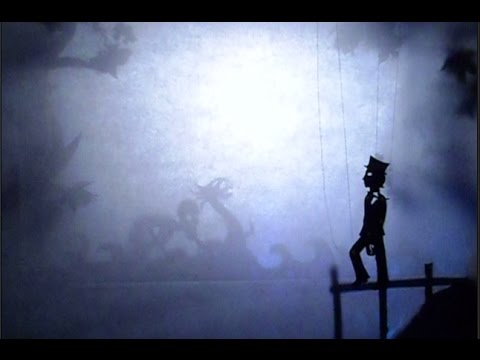
No budget for a video? DON’T PANIC. You all know the situation – you have a release coming out, but you’ve used all your budget to get the album sounding and looking as best it can. You always thought that in an aural medium, that part should come first. But everyone writing on indie music is telling you that it’s less than half the battle – that promotion is key and that people will listen with their eyes. So you need a video. In the world of indie music, people writing on the topic constantly tell to “put aside” money for this, and “make sure you have budget” for that. Personally, I find such advice irritating to read cos it glosses over the fact that it’s easier said than done. If you’re anything like me, you’ll be living hand to mouth, and pumping what little income you have from music straight back into your career as it is. You might also be loath to ask your listeners for yet another round of fan funding, seeing as they just supported the album. If you are anything like me, you will be looking around for ways to avoid costs, but still, somehow, get the important things done. Cutting corners will always have a price. The videos I make myself will always be less glossy than the ones I manage to get funding for – but we are lucky enough to live in an era when doing things yourself is respected. So before you read on, check out the following video which cost a total of 50 pounds. Yep, it does not LOOK like it cost thousands, but it turns out that a lot of people really like it. More importantly, it’s something you probably have all the ingredients to make at home: http://youtu.be/0UQ_QSGJLmg The Shadows of Others When I was a kid I used to love puppets. The town I lived in was so old-school that they had the occasional puppet theatre put on by the locals. There was not much else to do there unless you enjoyed watching rain or cows sinking into mud. Even so, it seemed like something from a bygone era at the time. Cut to a couple of decades later and my mum, who is into crafts, introducing me to Pinterest. As a closet introvert, forced to adopt social media, I really didn’t like the idea of yet another social network thing i had to keep up with. Then I saw postings about puppets and shadow theatre. There was a whole community of people into it. There were collections of classic puppet theatre from days gone by, as you would expect, but also current TV adverts had started to use it. It seemed to be going through a re-invigoration and I found the effects both amazing and personal. Puppeteering is a very intimate thing, and not the kind of performance that is reproducible the same way each time. Looking at what was involved I realized I had most of what I needed at home. This is what I used to make the video above: Old packaging / cardboard Duct tape and sellotape (by the truckload). Wire Split pins Pliers String Fimo (optional) Scissors Wood / sturdy cardboard, or some other means of constructing a “stage” for your shadow puppets. Lights. A studio light is best but a bulb on a cable would actually suffice. Tin foil – to build a housing for the light. Torches – to add extra light sources. The less tangible requirements: Endless patience (this I could not order on amazon). A BUCKETLOAD of time. An extra pair (or several extra pairs) of hands. Ie: get someone to help you man the puppets. A bit of an imagination. If you are reading this though, chances are, you are a musician, so you have some imagination already. Where to Start – spinning a yarn. The structure and planning phase of music videos with a narrative element is usually pretty much the same. I almost always hang things from a narrative in my vids (unless its a “singing head” vid). It makes the planning process a whole lot easier as it gives you a list of shots that need to be done, and sets that need to be made. Storyboards, characters, plot, and place are the things will answer the question of what to film. Do remember, that even if your actual songs dont have story, or characters, narrative is still a great tool to use in videos. It’s another tool from days gone by that is often re-invented in the present. Remember Aha’s “Take on Me”? The song itself really didn’t have a story, but in the video there were characters we identified with, and a tension that fostered a plot. In the end, it’s similar to writing short stories, but using visual and aural elements to enhance things. Characters I was lucky with my song “The Ferryman”. It already had characters and plot in there for me. The Ferryman himself, “the guy”, who wanted a free ride (in more than one sense) and And 4) the two women that “the guy” refused to chose between. If you don’t have characters in your song, it’s time to think of some. As they always say, a simple tale often works best, and if you are short of ideas, old tales/ fairytales do fit – especially with shadow puppets being such a nostalgic medium. If you’re worried about being cliched, add something unexpected to the story or it’s outcome. In the ferryman, “The Guy” doesn’t die OR chose between the women. Instead he gets tricked by the Ferryman into taking on his job of ferrying – thus losing the option to make choices ever again. Working with Archetypes Once you have a story, the next part is deciding how your characters should look. I tend to dislike it when films resort to archetypes because too often its an excuse not to put any real effort into showing what a character is like. Using archetypes is a time saving mechanism that relies on viewer assumptions to “flesh out” a character. Sadly, that often requires the viewer to think in ways that re-enforce a lot of the bad preconceptions and stereotypes about gender, race, sexuality and so on. With the Maiden, Mother, Crone EPs I was lucky though – the EPs are about archetypes. I got to use those archetypes to try and turn expectation on its head. There is no reason why you can’t as well. Above: the characters. The Ferryman is death. Easy. “The Guy” is a Lady’s man, so a pipe, hat and dapper suit were part of his design. The women are both people “The Guy” sees only in terms of their use to him, so that part was easy in my case too too. He sees one as his lover, and the other as the mother of his children. So we have the archetypal sexy woman and the archetypal long suffering and less attractive wife. The allure of the “sexy one” turns out to be a mirage. The ferryman berates the guy for seeing the “mother” as only that. In the end, he is punished for viewing them so shallowly at all. You Don’t Need to be Good At Drawing I only actually drew “the wife”, “the guy” and a bunch of fish freehand. Pinterest, and the web in general has a mass of resources on characters – especially if you are going for old stories and archetypes. The “sexy woman” was a trace of three different models, and the Ferryman a trace of two. Children I cannot draw at all, so they were straight traces. I found images that fit what I wanted, saved them to my hard drive, then viewed them in a graphics program, turning up the contrast and zooming in and out so I could trace them off the screen. I grabbed arms, legs, heads and torsos for the things I could not draw, and then cut them out and put them together. Narrative Structure – storyboards are your friend. Once you have your characters, you need to get the plot down. Storyboards are something I learned about working with professionals in film – Eloise Coveny introduced me to them with “The Proximity of Death” vid in around 2008. Basically its a sort of cartoon version of what you want to happen in the video itself. I am worse at illustration than I am at character design, but that seriously doesn’t matter. There only needs to be enough info to guide you on character interplay and place (setting). Behold my lack of illustration skills – Ferryman Storyboards: Storyboards become a reference manual against which you check that you have what you need. From there, I made a shot list and a list of scenes I needed to make (or source, if you are using real people). This is a checklist of what needs to be filmed to make your story work. Once you begin editing, you don’t want to have vital incidents missing. Imagine if they had forgotten to film the part where the girl wakes up in the rubbish bin from the “take on me” video. It would be a lot less complete in terms of narrative. Location Location…. Your kitchen. With shadow puppets you can set your story any place you like – so long as you can construct it with cardboard, sellotape, scissors and string. A caveat with shadow puppetry is moving parts. You have to know how many things need to move at any one time and limit the moving things in your shots to the number of arms on hand. For example – clouds, hair, and sea do not move on their own in the world of shadow puppets. You don’t want to know how long it took to come up with a workable solution for the fact that the whole video was set on the sea. I tried pulleys, hairdryers, systems of tubes with lead weights running along them. In the end I settled for the idea below: curved bits of wood that could be easily rocked and carry on rocking for a short time on their own afterwards. above: waves. I used crepe paper and cardboard for these, though they needed to be re-inforced with wire as they sagged when moved. Behind them on set were LED lights balanced on the wood itself. The plan was to use fairylights, but I figured I would probably end up setting fire to myself (yes, it HAS happened before). Here, split pins and double sided tape are your friends. I used split pins for all the joints on my characters, and double sided tape to hold in place the parts that didn’t need to move for different shots. LIGHTS – before cameras or action! I’ve mentioned before in posts about photos/ selfies that lighting is key. With shadow puppets, your most important piece of kit might well be your light box. It is the piece of gadgetry that will cost you something if you don’t already have one, but you do have a cheap option: you can actually get by with one bulb on a long chord and a stack of tin foil. I was lucky enough to already have a light in a proper reflective housing, but it wasn’t the right size. I’d designed the “stage” to be 4:3 ratio (rather than 16:9) because that is what my camera shoots at. It meant I had to increase the size of the housing with tin foil to the same size as the back wall of my 4:3 ratio puppet stage. The camera I used is the same one I mentioned in the article on self-done promo shoots. A samsung PL120. Layers and Depth. Above: building a light box. The idea is to create light that is as evenly spread as possible across the entire back surface of your “stage” so that anything that passes in front of it is shown in clear relief. Once I had my light housing the same size as my puppet stage, I fastened a “builders dust cloth” in front of it. You can pick them up at poundland for a quid. Any piece of white, translucent fabric big enough to cover the light box will do. This diffuses the light from the light box and gives you an even light source that will shine at whatever you put in front of it. I actually had two layers of cloth. One directly in front of the light source, and another about 40 cm closer to the camera. What this does is give one space (stage area 1) that looks “distant” (between the two layers of cloth) and another (stage area 2) that is in sharper focus (the one between the camera and both lots of cloth. Setting the Scene. My neighbor has a really nice garden. I have no garden and I live in London, so I have no idea where/whether there is anything actually living or growing that the public are allowed access to. I blame these factors for me stealthing into my neighbors back yard in the middle of the night to prune leaves and grasses to stick onto the trees I cut out of cardboard. The moral of the story: mixing construction with real biological items really does seem to make sets more convincing and interesting visually. Above: stage area 1 of the puppet theatre. Real foliage combined with the cardboard cutouts. Above – Stage area 2 (for objects in sharper focus) Above: The ferryman. He was a key character, and needed to be extra robust, so I made him from fimo instead of card. I traced his form, cut it out, then rolled some fimo into a sheet about 6mm thick. I sliced round the cutout with a kitchen knife. He is also taped into a jam jar for extra stability. Ready for Action? Just when you think you are ready to shoot, the intangible stuff comes in. Patience. Time. Things fall over. So much of what takes time in shadow puppetry is that things you assume will work, don’t. The ferryman wasn’t as well designed as I hoped and if I had thought about it, I would have realized that having to use a hand to hold him by his stalk meant I had one less hand to use for other tasks. He got put in an olive jar, stuffed haphazardly with loops of duct tape. It held him upright so I could use my hands to man his oar and his head. Problem solving using everyday objects seems to be a vital part of this process! The ferryman wasn’t the only thing that fell over. Framing a set with something visually interesting is a good idea, but they sag too. I used strips cut from cardboard boxes to re-enforece the back of most of the trees, stallagtites, and tall props to make sure they didn’t sag while I moved them – or halfway through a shot. Above: the back of the hanging tree… And its egg-carton anchor. Being flexible about how you get a shot from our shotlist done was a big part of the Ferryman vid. Fortunately, perfectionism isn’t required. I am not a perfectionist (as evidenced by my hand being in one of the shots in the final edit. Spot it and you get a prize). Being able to give up on what you thought was the coolest idea in the world is key to getting something finished. Especially when the music itself is the actual focus, and if you have a deadline. Once you start shooting, be careful you tick off every shot you need as you do it. The amount of time this can take (my vid took over 90 hours) you won’t remember what you have filmed and what you haven’t unless you keep a track. Post Production This always sounds like an expensive process. In the case of this vid it just means editing – and in a fairly rough fashion. The GOOD thing about shadow puppets is that the medium means you have to aim for long takes. Once they are “in the can”, it means editing isnt as tedious as it could be. That said, remember to shoot with continuity in mind. If a hand ends up top left in one shot, make sure it starts top left for the next. Not that I did that for a lot of shots. I hid a lot of my failure to do so with cutaways. They are a great way to get around bad edits, so make sure you get close shots and long shots of as many scenes as you can. And because this is an article on doing things on the cheap – some recommendations for editing software. I use “trakax” which retails at 32 quid, and offers a free 14 day trial. If you are still running Win XP though, the free “windows movie maker” that comes with the OS is actually usable, though fiddly. Finally Yes, people listen with their eyes, but remember – as an indie artist you don’t have to aim for something that is playable on TV anymore. Youtube, social media and the net in general mean what you are aiming for is something visually interesting and engaging that introduces people to your actual music. Also, the idea that people listen with their eyes is only useful to a point. I know from watching videos like Filters “Take a Picture” that visual extravagance can actually detract from the music itself. It was my faveorite track of theirs when I simply listened, but watching the video, there was so much going on that I didn’t notice the song at all! Make your life easier and aim for something that draws people into the world of your song. Good narrative helps people do that, as do moving images that are unusual – even if they are low fi and low budget. Last but not least, your listeners will appreciate that you did this yourself – and for them. Jordan Reyne is a full time indie musicians who tours the UK, Germany and Poland annually. She has 9 releases to her credit and 3 nominations for a Tui Award (New Zealand’s “Grammy” equivalent). Jordan writes, records and performs her own music as well as making her own videos, press shots, website, PR and DIY articles. More info at www.jordanreyne.com
Guest Post by Jordan Reyne: How to Make your own Music video using sellotape, paper, and a home camera
")


